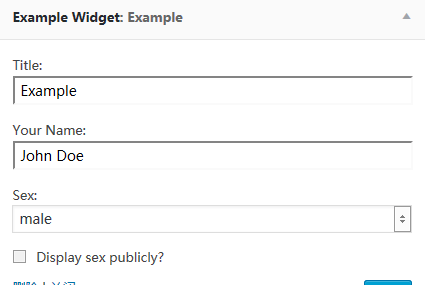
这是一段有详细注释的WordPress自定义小工具(Widget )开发实例代码,可用于制作主题时集成自定义小工具,将代码添加到主题functions.php中,具体效果如图:

<?php
/**
 * Add function to widgets_init that\'ll load our widget.
 * @since 0.1
 */
add_action( \'widgets_init\', \'example_load_widgets\' );
/**
 * Register our widget.
 * \'Example_Widget\' is the widget class used below.
 *
 * @since 0.1
 */
function example_load_widgets() {
    register_widget( \'Example_Widget\' );
}
/**
 * Example Widget class.
 * This class handles everything that needs to be handled with the widget:
 * the settings, form, display, and update.  Nice!
 *
 * @since 0.1
 */
class Example_Widget extends WP_Widget {
    /**
     * Widget setup.
     */
    function Example_Widget() {
        /* Widget settings. */
        $widget_ops = array( \'classname\' => \'example\', \'description\' => __(\'An example widget that displays a person\'s name and sex.\', \'example\') );
        /* Widget control settings. */
        $control_ops = array( \'width\' => 300, \'height\' => 350, \'id_base\' => \'example-widget\' );
        /* Create the widget. */
        $this->WP_Widget( \'example-widget\', __(\'Example Widget\', \'example\'), $widget_ops, $control_ops );
    }
    /**
     * How to display the widget on the screen.
     */
    function widget( $args, $instance ) {
        extract( $args );
        /* Our variables from the widget settings. */
        $title = apply_filters(\'widget_title\', $instance[\'title\'] );
        $name = $instance[\'name\'];
        $sex = $instance[\'sex\'];
        $show_sex = isset( $instance[\'show_sex\'] ) ? $instance[\'show_sex\'] : false;
        /* Before widget (defined by themes). */
        echo $before_widget;
        /* Display the widget title if one was input (before and after defined by themes). */
        if ( $title )
            echo $before_title . $title . $after_title;
        /* Display name from widget settings if one was input. */
        if ( $name )
            printf( \'<p>\' . __(\'Hello. My name is %1$s.\', \'example\') . \'</p>\', $name );
        /* If show sex was selected, display the user\'s sex. */
        if ( $show_sex )
            printf( \'<p>\' . __(\'I am a %1$s.\', \'example.\') . \'</p>\', $sex );
        /* After widget (defined by themes). */
        echo $after_widget;
    }
    /**
     * Update the widget settings.
     */
    function update( $new_instance, $old_instance ) {
        $instance = $old_instance;
        /* Strip tags for title and name to remove HTML (important for text inputs). */
        $instance[\'title\'] = strip_tags( $new_instance[\'title\'] );
        $instance[\'name\'] = strip_tags( $new_instance[\'name\'] );
        /* No need to strip tags for sex and show_sex. */
        $instance[\'sex\'] = $new_instance[\'sex\'];
        $instance[\'show_sex\'] = $new_instance[\'show_sex\'];
        return $instance;
    }
    /**
     * Displays the widget settings controls on the widget panel.
     * Make use of the get_field_id() and get_field_name() function
     * when creating your form elements. This handles the confusing stuff.
     */
    function form( $instance ) {
        /* Set up some default widget settings. */
        $defaults = array( \'title\' => __(\'Example\', \'example\'), \'name\' => __(\'John Doe\', \'example\'), \'sex\' => \'male\', \'show_sex\' => true );
        $instance = wp_parse_args( (array) $instance, $defaults ); ?>
        <!-- Widget Title: Text Input -->
        <p>
            <label for=\"<?php echo $this->get_field_id( \'title\' ); ?>\"><?php _e(\'Title:\', \'hybrid\'); ?></label>
            <input id=\"<?php echo $this->get_field_id( \'title\' ); ?>\" name=\"<?php echo $this->get_field_name( \'title\' ); ?>\" value=\"<?php echo $instance[\'title\']; ?>\" style=\"width:100%;\" />
        </p>
        <!-- Your Name: Text Input -->
        <p>
            <label for=\"<?php echo $this->get_field_id( \'name\' ); ?>\"><?php _e(\'Your Name:\', \'example\'); ?></label>
            <input id=\"<?php echo $this->get_field_id( \'name\' ); ?>\" name=\"<?php echo $this->get_field_name( \'name\' ); ?>\" value=\"<?php echo $instance[\'name\']; ?>\" style=\"width:100%;\" />
        </p>
        <!-- Sex: Select Box -->
        <p>
            <label for=\"<?php echo $this->get_field_id( \'sex\' ); ?>\"><?php _e(\'Sex:\', \'example\'); ?></label>
            <select id=\"<?php echo $this->get_field_id( \'sex\' ); ?>\" name=\"<?php echo $this->get_field_name( \'sex\' ); ?>\" class=\"widefat\" style=\"width:100%;\">
                <option <?php if ( \'male\' == $instance[\'format\'] ) echo \'selected=\"selected\"\'; ?>>male</option>
                <option <?php if ( \'female\' == $instance[\'format\'] ) echo \'selected=\"selected\"\'; ?>>female</option>
            </select>
        </p>
        <!-- Show Sex? Checkbox -->
        <p>
            <input class=\"checkbox\" type=\"checkbox\" <?php checked( $instance[\'show_sex\'], true ); ?> id=\"<?php echo $this->get_field_id( \'show_sex\' ); ?>\" name=\"<?php echo $this->get_field_name( \'show_sex\' ); ?>\" />
            <label for=\"<?php echo $this->get_field_id( \'show_sex\' ); ?>\"><?php _e(\'Display sex publicly?\', \'example\'); ?></label>
        </p>
    <?php
    }
}
?>本站除原创内容,其余内容均收集自互联网,仅限用于学习和研究目的,本站不对其内容的合法性、可用性承担任何责任。本站禁止以任何形式发布或转载任何违法相关信息,若您发现请立即向站长举报;用户投稿一切资源内容不代表本站立场,并不代表本站赞同其观点和对其真实性负责。
如有版权内容,其版权均归原作者所有,本站虽力求保存原有版权信息,但因众多资源经多次转载,已无法确定其真实来源,故敬请原作者谅解!为尊重作者劳动成果,请购买正版支持作者,谢谢!若您对「HULIKU.COM」所载资源作品版权归属存有异议,请发送邮箱:ihuliku@qq.com 进行处理。
本站资源文件大多存储至云盘,如您发现图片或链接失效,请联系站长或作者,我们将及时进行更新。资源都是经过站长或作者收集测试优化后进行发布分享。如若转载请在贵站文内以超链形式注明狐狸库文章出处,谢谢合作!


![WordPress子比主题美化教程合集[2023/04/17]-狐狸库](https://huliku.com/pic/2023032607024935.png)
![狐狸库自定义子比主题底部footer页脚美化(自适应)[06.26]更新-狐狸库](https://huliku.com/pic/2023062610013835.png)


请登录后查看评论内容