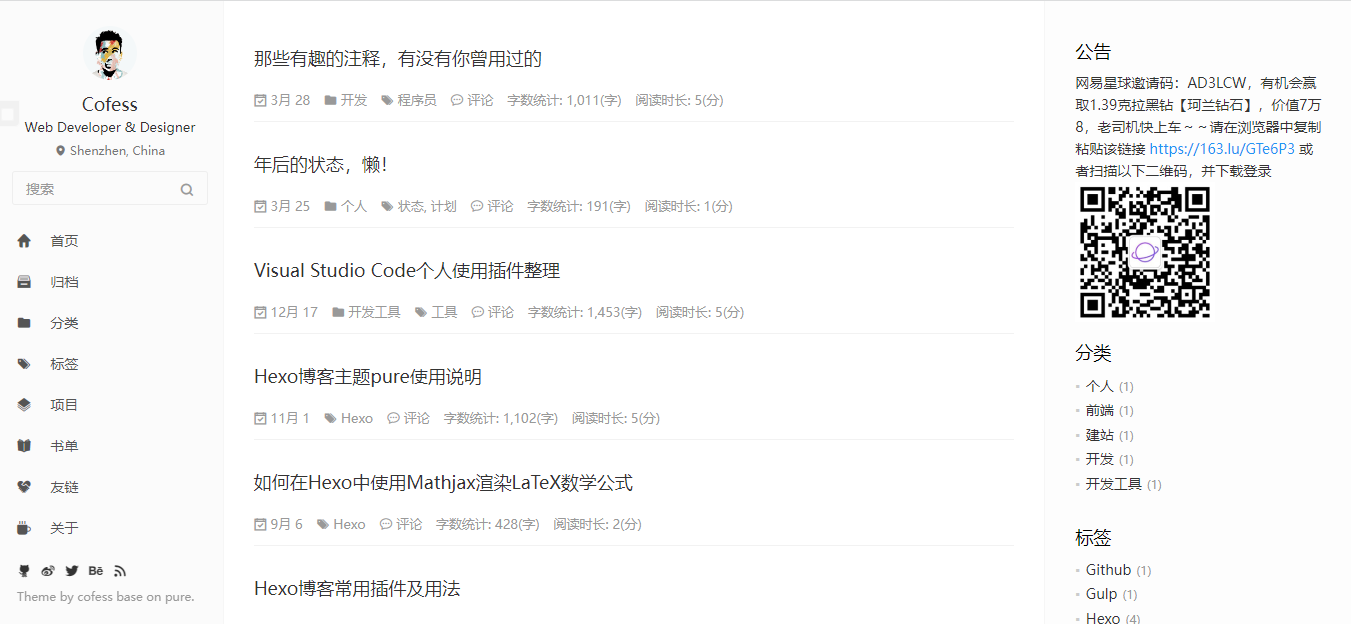
相关链接
GitHub:https://github.com/cofess/hexo-theme-pure
官方文档:https://github.com/cofess/hexo-theme-pure/blob/master/README.cn.md
特色
多语言
第三方评论框(友言、来必力、gitment、gitalk)
可展示个人豆瓣书单
可展示个人github托管项目
可设置支付宝、微信打赏
配置说明
在 Hexo 中有两份主要的配置文件,其名称都是 _config.yml。 其中,一份位于站点根目录下,主要包含 Hexo 本身的配置;另一份位于主题目录下,这份配置由主题作者提供,主要用于配置主题相关的选项。为了描述方便,在以下说明中,将前者称为站点配置文件, 后者称为主题配置文件。
使用教程
安装主题
git clone https://github.com/cofess/hexo-theme-pure.git themes/pure更新主题
cd themes/pure
git pull
启用pure主题
打开站点配置文件,找到theme字段,将其值更改为 pure
theme: pure到此,主题安装完成。然后启动Hexo服务验证主题是否正确启用。
hexo s安装插件
npm install hexo-wordcount –save
npm install hexo-generator-json-content --savenpm install hexo-generator-feed --savenpm install hexo-generator-sitemap --savenpm install hexo-generator-baidu-sitemap --save主题配置
设置语言
打开站点配置文件, 将 language 设置成你所需要的语言。建议明确设置你所需要的语言,可选值对应themes\pure\languages目录下语言文件,简体中文配置如下:
language: zh-CN主题颜色
定制了五套颜色,默认白,黑:theme-black,蓝:theme-blue,绿:theme-green,紫:theme-purple
# config
config:
skin: # 主题颜色 theme-black theme-blue theme-green theme-purple
导航菜单
# 导航菜单
menu:
Home: .
Archives: archives # 归档
Categories: categories # 分类
Tags: tags # 标签
Repository: repository # github repositories
Books: books # 书单
Links: links # 友链
About: about # 关于

# 导航菜单图标(font awesome)
menu_icons:
enable: true # 是否启用菜单图标
home: icon-home-fill
archives: icon-archives-fill
categories: icon-folder
tags: icon-tags
repository: icon-project
books: icon-book-fill
links: icon-friendship
about: icon-cup-fill
设置个人信息
头像在themes\pure\source\images 目录下替换图片即可,捐献的二维码同理。
个人信息大部分都在 主题配置文件 中设置
搜索
主题内置三种站内搜索方式:insight、swiftype、baidu
# Search
search:
insight: true # you need to install `hexo-generator-json-content` before using Insight Search
swiftype: # enter swiftype install key here
baidu: false # you need to disable other search engines to use Baidu search
分享
支持weibo,qq,qzone,wechat,tencent,douban,diandian,facebook,twitter,google,linkedin
# Share
# weibo,qq,qzone,wechat,tencent,douban,diandian,facebook,twitter,google,linkedin
share:
enable: true # 是否启用分享
sites: weibo,qq,wechat,facebook,twitter # PC端显示的分享图标
mobile_sites: weibo,qq,qzone # 移动端显示的分享图标
评论
主题集成了disqus、友言、来必力、gitment、gitalk评论系统,选择其中一种即可
# Comment
# Gitment
# Introduction: https://imsun.net/posts/gitment-introduction/
comment:
type: livere # 启用哪种评论系统
disqus: # enter disqus shortname here
youyan:
uid: *** # enter youyan uid
livere:
uid: *** # enter livere uid
gitment:
githubID: username
repo: username.github.io
ClientID: ***
ClientSecret: ***
lazy: false
文章浏览量统计
主题内置了不蒜子和leancloud来统计文章浏览量,启用其中之一即可,注意leancloud需要到其官网申请APP ID 和APP Key。
比如,启用不蒜子来统计文章浏览量,在主题配置文件中把busuanzi设置为true即可:
pv:
busuanzi:
enable: true # 不蒜子统计
如果不需要第三方来统计浏览量,只需将相应设置改为false即可(设置为false后不会加载第三方JS脚本)
项目
复制theme/pure/_source/ 目录下repository文件夹到blog path/source/ 目录下
新版配置(支持 Github 和 Gitee):
新版配置将会覆盖旧版的 github 配置!
# Repository Info (This will override 'github' option)
# 项目仓库展示信息(将会覆盖 github 项)
repository:
platform: github # 托管平台(github | gitee)
username: *** # 用户名
旧版配置(仅支持 Github):
# Github
github:
username: *** # github username
豆瓣书单
复制theme/pure/_source/ 目录下books文件夹到blog path/source/ 目录下
# douban 豆瓣书单
douban:
user: *** # 豆瓣用户名
start: 0 # 从哪一条记录开始
count: 100 # 获取豆瓣书单数据条数
友情链接
复制theme/pure/_source/ 目录下links文件夹到blog path/source/ 目录下
在 hexo 目录下的 source 文件夹内创建一个名为 _data(禁止改名)的文件夹。
然后在文件内创建一个名为 links.yml 的文件,在其中添加相关数据即可。
单个友情链接的格式为:
Name:
link: http://example.com
avatar: http://example.com/avatar.png
desc: "这是一个描述"
添加多个友情链接,我们只需要根据上面的格式重复填写即可。
. 将 Name 改为友情链接的名字,例如 Cofess。
. http://example.com 为友情链接的地址。
. http://example.com/avatar.png 为友情链接的头像。
. 这是一个描述 为友情链接描述。
文章索引目录
title: 文章标题
categories:
- 文章分类
tags:
- 文章标签
toc: true # 是否启用内容索引sidebar侧边栏
文章侧边栏默认为开启状态,如果某篇文章不想开启侧边栏,在文章开头配置加入“sidebar: none”即可:
title: 文章标题
categories:
- 文章分类
tags:
- 文章标签
sidebar: none # 是否启用sidebar侧边栏,none:不启用
博客优化
auto Minify html、js、css and make it neat
npm install hexo-neat --save在博客配置文件_config.yml中添加
# hexo-neat
neat_enable: true
neat_html:
enable: true
exclude:
neat_css:
enable: true
exclude:
- '*.min.css'
neat_js:
enable: true
mangle: true
output:
compress:
exclude:
- '*.min.js'npm install hexo-baidu-url-submit --save使用Google翻译,百度翻译和有道翻译将Hexo中的汉字标题转成英文标题
安装
npm install hexo-translate-title --save在博客配置文件_config.yml中添加
translate_title:
translate_way: google #google | baidu | youdao
youdao_api_key: XXX
youdao_keyfrom: XXX
is_need_proxy: true #true | false
proxy_url: http://localhost:8123
注意:判断是否需要配置google本地代理,因为我在本地是开启时才能访问google翻译的,如果没有被墙,请将_config.yml 下的is_need_proxy: true改为false。如果设置为true,请设置本地代理地址
数学公式
Hexo默认使用”hexo-renderer-marked”引擎渲染网页,该引擎会把一些特殊的markdown符号转换为相应的html标签
解决方案有很多,可以网上搜下,为了节省大家的时间,这里只提供亲身测试过的方法。
更换Hexo的markdown渲染引擎,hexo-renderer-markdown-it-plus引擎替换默认的渲染引擎hexo-renderer-marked即可。
安装hexo-renderer-markdown-it-plus插件
npm un hexo-renderer-marked --save
npm i hexo-renderer-markdown-it-plus --save
配置
安装插件后,如果未正常渲染LaTeX数学公式,在博客配置文件_config.yml中添加
markdown_it_plus:
highlight: true
html: true
xhtmlOut: true
breaks: true
langPrefix:
linkify: true
typographer:
quotes: “”‘’
plugins:
- plugin:
name: markdown-it-katex
enable: true
- plugin:
name: markdown-it-mark
enable: false
文章启用mathjax
title: Hello World
mathjax: true本站除原创内容,其余内容均收集自互联网,仅限用于学习和研究目的,本站不对其内容的合法性、可用性承担任何责任。本站禁止以任何形式发布或转载任何违法相关信息,若您发现请立即向站长举报;用户投稿一切资源内容不代表本站立场,并不代表本站赞同其观点和对其真实性负责。
如有版权内容,其版权均归原作者所有,本站虽力求保存原有版权信息,但因众多资源经多次转载,已无法确定其真实来源,故敬请原作者谅解!为尊重作者劳动成果,请购买正版支持作者,谢谢!若您对「HULIKU.COM」所载资源作品版权归属存有异议,请发送邮箱:ihuliku@qq.com 进行处理。
本站资源文件大多存储至云盘,如您发现图片或链接失效,请联系站长或作者,我们将及时进行更新。资源都是经过站长或作者收集测试优化后进行发布分享。如若转载请在贵站文内以超链形式注明狐狸库文章出处,谢谢合作!


![子比主题美化 - 文章列表显示自定义修改,列表[一行两个]卡片[一行五个]-狐狸库](https://huliku.com/pic/20240519174022715.png)


![WordPress子比主题美化教程合集[2023/04/17]-狐狸库](https://huliku.com/pic/2023032607024935.png)
![狐狸库自定义子比主题底部footer页脚美化(自适应)[06.26]更新-狐狸库](https://huliku.com/pic/2023062610013835.png)


请登录后查看评论内容